Table of contents
Introduction
Getting started
Changing the suspension
Upgrading the front brakes
Upgrading the rear brakes
Modifying the Engine Bay
Dropping in the new power plant
Modifying the exhaust
(all images can be clicked on for LARGE view)
Submitted by Eddie Terrell : e_terrell@motherwell.com.au
Introduction
It doesn’t matter how young or old,  or what gender, you are if you have a need for
speed then that need will continue with you throughout your life.I have owned many sports
machines and in most cases have carried out some form of modification in order to increase
performance. Today’s performance sports cars are fast and precise and a pleasure to
drive.
or what gender, you are if you have a need for
speed then that need will continue with you throughout your life.I have owned many sports
machines and in most cases have carried out some form of modification in order to increase
performance. Today’s performance sports cars are fast and precise and a pleasure to
drive.
Although sports cars do provide a lot of enjoyment and are
fun to own and drive, I have always had the urge to go even faster and drive something
that is commonly known as the "Street Sleeper", the vehicle that no one would
recognize as the vehicle that was going to launch itself down the road and out of sight.
It was with this in mind that I set about looking for my own little "Street
Sleeper".
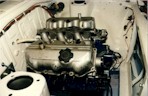
Being a Nissan man and a 300ZX nutter there was only ever
going to be one engine choice (3 litre V6) and the obvious vehicle was the Datsun 1200
utility or as it is known in other countries the Datsun 110 Utility.
This project was started in 1989 and completed in early
1990. The transplant was a great success, and has been copied by about 5 others in my home
town. At the end of 1996 the motor was pulled down mainly for horsepower and everything
else was given an overhaul at the same time. When I completed this project the first time
I didn’t really take a lot of photographs along the way and so the photos that you
see in this article are mostly taken during this rebuild.
Getting started
The initial task for this project was to go out and find a
1200 Utility that was in good condition body wise. This was not an easy thing to do as the
importation of these vehicles into Australia finished during 1986. In addition any that
could be found in good condition were definitely not for sale. Eventually I found the
perfect vehicle one that only had 32000 kilometres on the clock and had been in storage
for a considerable time, as a part of a deceased estate. I was forced to pay top dollar to
ensure that I had first choice, but I figured it was worth the cost. picture
I had a mental picture of how the finished article should
appear. The prime objective outside of wanting to go fast was for the vehicle to appear as
normal as possible on the road. This would mean that I would make every effort to avoid
modifying the external body work unless it was essential.
These vehicles in standard form were fitted with drum
brakes all round and would obviously need a brake upgrade before the big horsepower engine
was installed. There were many options for brake upgrades and ignoring most of the advice
I was receiving headed of on my own course. At the end of the day every thing worked out
OK and the amount of work required was minimal. In addition to upgrading the brakes it
would also be necessary to change the suspension components, and so this work was carried
out at the same time as the brake upgrade.
Changing the suspension
As the original brakes on this vehicle were drums it would
be necessary to change out the strut assemblies in order to fit the disc brake set up. The
choice here was to purchase Datsun Sunny (Datsun 210) or Datsun 1600 (Datsun 510) struts.
Of course it is possible once again to fit any strut, however there is an advantage with
using the above mentioned struts and we will address that later when talking about brakes.
I chose the 210 struts, mainly because there was a bigger
supply of these at the wrecking yards. In hindsight the 510 struts may have been better as
they make work a lot easier when fitting adjustable supports at the top of the tower.
In order to increase the effect of the dampers Datsun 240Z
gas inserts were installed into the new struts. These dampers are shorter than the stock
units and so the struts can be shortened by 53mm which is a help in getting the finished
ride height of the vehicle where we want it.
When the struts are completed position them back into the
vehicle without the springs installed. Refit the wheels and then lower the jack or hoist
unlit the vehicle sits at the required ride height. Measure the distance between the top
and bottom spring flange, and cut of a piece of exhaust tubing to the length that you
measured. Remove the struts from the vehicle again and install the dummy springs. When the
vehicle is put back onto the ground it will be sitting at the ride height that you are
wanting when the engine transplant is completed.
When the transplant is completed we will weigh the vehicle
at each front wheel and with this, plus knowing the ride height and extended height of the
spring we will be able to go ahead and order the new springs.
Reweigh the vehicle and enter data here
The completed on road weight of the vehicle is 900kgs or
1980lbs.
Upgrading the front brakes
There are many brake systems around that could be fitted in
order to enhance the stopping ability of the vehicle. 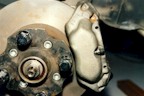 I
was very keen to have a vented front disc system and some serious calipers. If this car
was to go fast then it had to stop fast also. Some of the things that I will talk about
here may sound rather simple but believe me it took many hours of wandering around the
wrecking yards to find the appropriate components to complete this conversion to the
standard that I was looking for. I might also add that there are many more options
available in the wrecking yards today.
I
was very keen to have a vented front disc system and some serious calipers. If this car
was to go fast then it had to stop fast also. Some of the things that I will talk about
here may sound rather simple but believe me it took many hours of wandering around the
wrecking yards to find the appropriate components to complete this conversion to the
standard that I was looking for. I might also add that there are many more options
available in the wrecking yards today.
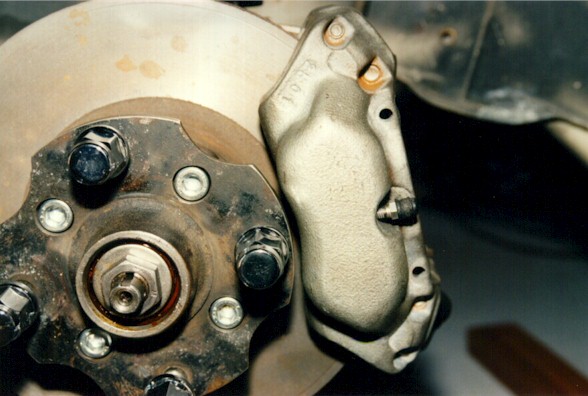
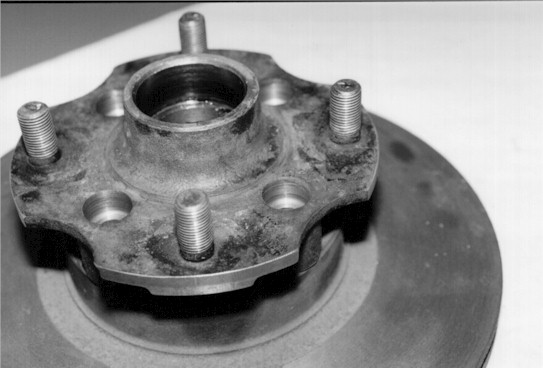
The first step was to find vented brake rotors that could
be fitted to the Sunny / 110 wheel hub. The final choice was to purchase discs from a
Subaru Leone, which has the same bolt pattern as the standard disc. To fit these discs the
wheel hub is machined out to enable Cap head screws to be used.
While the wheel hubs are in the machine shop there is
another job that can be under taken at this time. The outer diameter of the wheel hub must
be turned down to a maximum diameter of 140mm to allow clearance for the new brake caliper.
I have chosen Volvo 240DL calipers. The Volvo calipers are
4 piston with mounting points that allow them to be bolted directly onto the strut leg. Absolutely
no modification required. In addition the center line of these calipers coincides with
the center line of the newly installed discs. You will however have to connect both sets
of pistons to the brake feed line. The brake calipers when fitted to the Volvo had a dual
braking system, however it is quite easy to simply mount a "T" piece onto the
strut leg and plumb to both ports.
Upgrading the rear brakes
Once again there are many options available for rear end
braking. 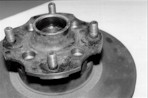 I have chosen Mitsubishi Scorpion
(Australian model) which have a rear disc which can be mounted over the existing rear
wheel axle. I am staying with the live rear axle at this time. For calipers we have chosen
units from a 124 Fiat Sports. These were chosen because of the mechanical hand brake lever
attachment. As mentioned earlier there are many more options available in the wrecking
yards today so take the time to wonder around. Even now I am planning the next conversion,
having seen what is now available.
I have chosen Mitsubishi Scorpion
(Australian model) which have a rear disc which can be mounted over the existing rear
wheel axle. I am staying with the live rear axle at this time. For calipers we have chosen
units from a 124 Fiat Sports. These were chosen because of the mechanical hand brake lever
attachment. As mentioned earlier there are many more options available in the wrecking
yards today so take the time to wonder around. Even now I am planning the next conversion,
having seen what is now available.
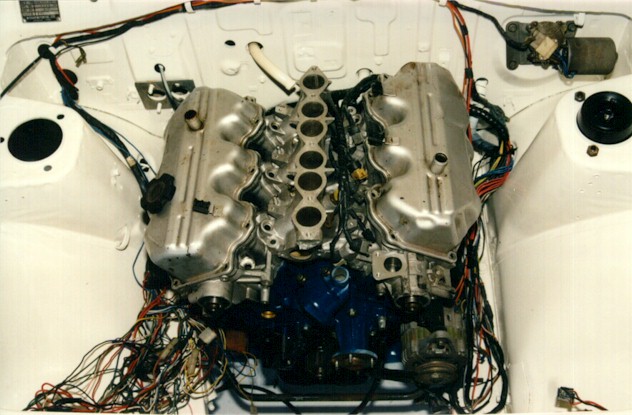
Modifying the Engine Bay
Surprisingly enough there are no modifications
to make in the engine bay apart from a few mountings that need to be installed to mount
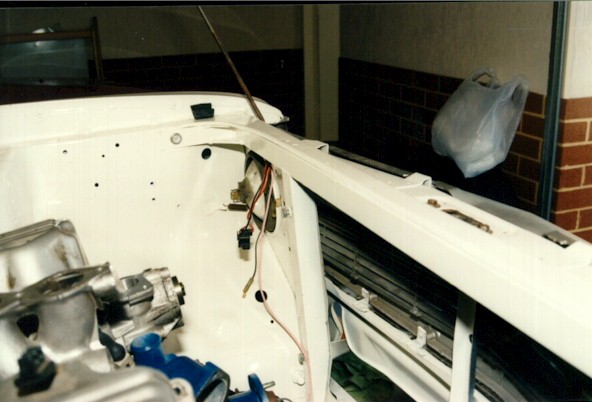
additional control gear.  Having
said that I did make a few engine bay modifications simply to improve access and
appearance. The first was to move the battery mount to the rear tray area. It was
previously mounted behind the right hand headlight. The next step was to cut away the
radiator support panel. After cutting away a truss section constructed from 32mm square
aluminum was install inside the bay. This support cannot be seen and is ideal for mounting
the bigger and heavier radiator.
Having
said that I did make a few engine bay modifications simply to improve access and
appearance. The first was to move the battery mount to the rear tray area. It was
previously mounted behind the right hand headlight. The next step was to cut away the
radiator support panel. After cutting away a truss section constructed from 32mm square
aluminum was install inside the bay. This support cannot be seen and is ideal for mounting
the bigger and heavier radiator.
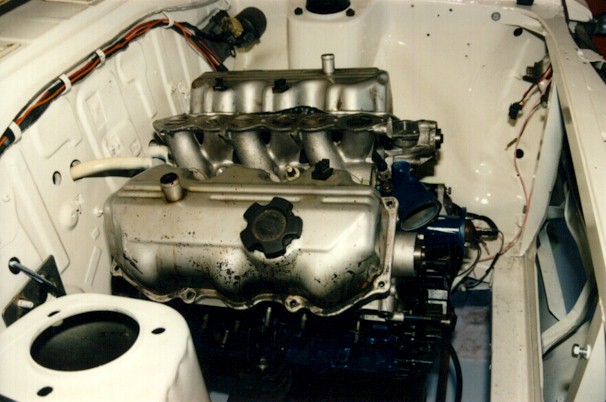
Dropping in the new power plant
Modifying the exhaust
 or what gender, you are if you have a need for
speed then that need will continue with you throughout your life.I have owned many sports
machines and in most cases have carried out some form of modification in order to increase
performance. Today’s performance sports cars are fast and precise and a pleasure to
drive.
or what gender, you are if you have a need for
speed then that need will continue with you throughout your life.I have owned many sports
machines and in most cases have carried out some form of modification in order to increase
performance. Today’s performance sports cars are fast and precise and a pleasure to
drive.