|
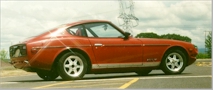
It all started because I couldn't leave my Z
alone. I have been altering the Z for years now and have just about maxed out its
potential while still retaining driveability. This is my grocery getter/autocrosser/road
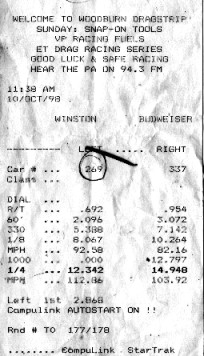
warrior. The L-28 would deliver 28 MPG on the freeway, do 0-60 in 5.7 sec, the 1/4 mi in
14.4 sec @ 97 MPH, pretty respectable for a street car right? Well as some of you Tim
Allens know you can never have enough power. 1st gear had incredible thrust, 2nd gear was
definitely fun, 3rd gear would still pull real hard, 4th gear still pretty impressive
pull, but I wanted that set back in the seat feeling that I got in first gear in my second
gear and so forth. After much deliberation I realized that the only way to increase the
torque of the Z was to turbo it, supercharge it, or motor swap. We all know that torque is
what you feel, horsepower is torque over time. The turbo was out of the question as I love
that INSTANTANEOUS thrust of natural aspiration. This left supercharging or motor swap.
The supercharged kits I have priced are around $3500-$4500 dollars not incl.
rebuilding the engine to handle all the extra BMEP. This left motor swap as my option. I
have always had an interest in the Rotary engine and have heard you could stack these
things in a line. WOW, two rotary engines, approx. 150 hp each, easy to do, still lighter
than the straight six with more room left over. Cost again played a role in shooting this
option down. Well how bout keeping with the NISSAN tradition and putting in a 90+ ZX twin
turbo? $5000 for the complete engine and if anything ever went wrong with it it goes to
the dealer and some of them might not even touch it as it is not in its original home and
if they would, have you seen dealership shop rates lately?Well the CHEV little block was
looking pretty appealing at this point. There is even a manual written by Mike Knell from
Jaguars That Run, (JTR) that I purchased, very informative, and even covers the suspension
like no other book I have, I have the how to hotrod your Datsun Z, 510 etc book, How to
make your car handle book written by Fred Puhn, and Chassis Engineering, but JTR book is
by far the most informative. I found a 350 four bolt for next to nothing, traded a little
multi meter for it, and parts are REAL inexpensive.
There are several manufacturers of
heads, aluminum and iron in every possible configuration and at prices that are well below
Z stuff. Cam kits, brand name cams in every possible grind that can be done for under $120
incl. lifters. There are also these roller cams and roller lifters, windage trays,
induction combinations that would make you dizzy, exhaust combos that......Well you get
the point. Bang for the buck, the Chev little block swap can't be beat. I bought a close
ratio, World Class Five speed out of a 91 Camaro IROC out of Arizona. I picked up the 4
bolt main 350 from this guy and tore it down to find that it had eaten the thrust bearing
and the crank had contacted the main webs. I found a High performance Machine shop that
had a 350 four bolt main short block for sale and after some time talking with this shop
found that they also had a set of desirable small chamber heads also. I talked with the
owner about this possible combo for quite some time and even went down to the shop to see
what he had and what his operation was like. I was also contemplating using the ZZ3 GM
crate engine or a Jaspers High Po 350 engine. Well after talking with the owner at great
lengths about what I wanted and what he could do for me I chose to have this shop do it
for me. What really sold me on it was his knowledge of making power and building strong
reliable engines and that I could also help in the building/machining process of my own
engine. My background is Aviation Maintenance/machinist and building high po Z cars and
with my knowledge and abilities me and the owner of JLS Automotive Machine hit it off
quite well. I took the heads home and ported them myself. When I took them back for the
machine work to be performed the owner was so impressed with my porting abilities he
offered me a job on the spot. after several months of him asking me to work for him and
helping out at the shop on some weekends I accepted his invitation and haven't regretted
it. This is one of the most thorough and knowledgeable shops around the greater Portland
OR area.
****NOTE****
I did this swap as per the JTR manual and any thing I did different I put down here for
all to read....I brought the completed engine home and took some measurements as to where
I wanted to locate the alternator. I wanted it as low as possible and of course to look
clean. I used the Datsun Alternator and the Z lower alt bracket and machined it down to
bolt onto where the V-8 fuel pump would normally go and used my Performance Engineering
top alt bracket after lengthening it, this worked fine.
************************************************
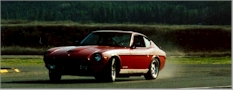
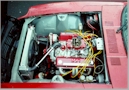
THE CAR
The car was stripped down from the firewall forward incl. the fenders, wiring, and all
brackets that were spot-welded to the inside of the engine bay. TECH TIP>>> Use a
slightly larger drill than the spot weld is big and drill the spot welds on the part being
removed, in this case it was the brackets in the engine by and all that is left is small
holes that can be filled in with body filler, (My dad uses JB weld for this, to each his
own.)
After making the hood latch per the Manual I would crawl into the engine bay with hood
partially on and pull it up its resting location and trial fit the hood latch bracket to
see where it be located on the firewall and used my trusty Sharpie felt marker to mark
it's location. Then I would remove the hood, examine the location on the wiper motor side
of the firewall and made the marks for the bolts then mounted the bracket. After much
debating as to how the hydraulic clutch would be done I settled on one of two options, the
JTR Manuals way by using a TILTON 3/4" bore master cyl, (The 67 DATSUN Pickup used a
3/4" master cyl that would be less expensive at the local parts store) and tapping
the plastic slave cyl for SAE pipe threads or using the stock 5/8" dia Z master cyl.
IF you use the Z master cyl you have to shorten the length on the release fork between the
pivot ball and the slave cyl attachment point. The stock measurement is 5.75" in. By
shortening the length to 4"in this would give the fork enough throw to fully
disengage the clutch, this also moves the slave cyl next to the bell housing, more
clearance for exhaust and fork release between the firewall, all that is needed is to tap
the plastic slave cyl for 10 mm x 1 metric thread and shorten the stock clutch line as the
slave cyl is on the driver side. I heated the fork to red hot and dimpled the slave cyl
end with a dimpler I made just for this purpose, (Thank God I work at a machine shop) and
cut the excess off. Now I had to clamp the bell housing on the mill and machine down the
slave cyl mounting to relocate the slave cyl and angle the hydraulic line to whatever
angle I felt would give the best all around clearance.All this does pose one prob though,
now the slave cyl is directly in the middle of the oil filter. I used a SUMMIT RACING
remote oil filter kit and went down to the local Home Depot and used 90 deg fittings and
relocated the filter to just behind the radiator in front of the engine for easy access
and to keep the CG as low as possible. With the trans/engine bolted together it was time
to trial fit the entire package. The engine mounts fit perfectly, and now it was time to
make the trans bracket. Mine came out very similar to the manuals except that there is
diff in bodies on the Z cars. Basically there are two different bodies. 70-74 and 74
1/2-78. The 74 1/2-78 have a wider trans tunnel, lower bottom radiator core support,
longer and stronger frame rails under the cockpit, stronger T/C rod brackets. The wider
tunnel allows for a lot more exhaust room and a wider trans bracket. The JTR manual's
bracket will fit all Z cars but not make use of all the extra room the 74 1/2-78 cars have
I then removed the engine/trans and began to make adjustments to the install accordingly.I
rewired the engine bay harness and modified according to the cars intended purpose and
hooked up the alt and powered the circuits to make sure everything worked before I dropped
in the engine/trans for good.
I did some extensive modifications to the rear crossmembers and raised the diff by approx.
2 1/2" to gain more exhaust ground clearance. I used a Datsun 510 oil pressure
sending unit wired to an LED I installed in the oil pressure gauge so as to have an
immediate low oil pressure warning system, I recommend this for all Z cars.Headers. The
JTR manual recommends the S&S Headers full length header. I would agree on a real high
performance engine and I even bought these only to find out they will not work on a
lowered Z. I was told by the designing engineer at S&S Headers that these headers hang
no more than 1/2" in below the oil pan. Installing everything as per the JTR Manual
the stock chev oil pan hangs 3/4" in below the crossmember, and my cross member is
only 3 3/4" in off of the ground. I found that these headers hang 2" below the
pan, not 1/2" in. I mocked up two other Chev small blocks at the shop on engine
stands, used several stock oil pans and this measurement came out the same every time.
With a straight edge across the collectors, there was exactly 2" in to the bottom of
the lowest part of the oil pan. This would give my collectors only 1" in ground
clearance. Not good, so I used the Hooker Street rod headers instead and I am very
impressed these.I used a Ron Davis Racing Radiator, all aluminum construction, cross flow
design and 3"in thick, exactly like the Howe Racing radiator. These Radiators are
used in Nascar and keep those 8000 RPM, 700 hp engines cool they should keep my 350 HP
6000 RPM engine comfortable.I used the 19" by 26" radiator and it fit perfectly
between the frame rails and on the 74 1/2-78 Zs will sit parallel with the lower core
support and level with the upper core support. I wander if it was originally designed for
the Z? Any way, even a six cyl Z could use this radiator with the Chevy outlet/inlet
configuration as it is the same as the Z. this radiator only costs $199 new. Parts and
info sources....
Paul Ruschman owner and installer of the 280ZR1 braap@datsuns.com
Summit Racing http://www.summitracing.com/retlstor.htm
(330) 630-3030
JEG'S High Performance 1-800-345-4545
Jaguars That Run (JTR)
ph (510) 462-3619 9:00am-4:45pm Pac
Time fax (510) 846-3642 P.O. Box 66
Livermore, CA 94551
* * Car is currently dismantled -
R.I.P. ** |
